
Payment Gateway Compliance & Information
If you have completed the Apple Pay integration between Ottu and Apple, the Checkout SDK will automatically make the necessary checks to display the Apple Pay button.
When you initialize the Checkout SDK with your session_id and payment gateway codes, the SDK will automatically verify the following conditions:
When initializing the Checkout SDK, a session_id with a pg_codes that was associated with the Apple Pay Payment Service was supplied.
The customer has an Apple device that supports Apple Pay payments.
The browser being used supports Apple Pay.
The customer has a wallet configured on their Apple Pay device.
If all of these conditions are met, the Apple Pay button will be displayed and available for use in your checkout flow. If the wallet is not configured, the Apple Pay button will still appear.Clicking on the button Apple Pay wallet on their device will open, allowing them to configure it and add payment cards.
By default, the type of the Apple Pay button is pay, which is used to initiate a payment. However, you can override the default button type using the applePayInit property of the Checkout SDK.
If you're using only the Apple Pay button from the Checkout SDK and wish to customize its appearance, it's vital to adhere to the Apple Pay guidelines to ensure your design aligns with Apple's specifications. Note that the SDK uses default styles outlined in the guidelines. Using styles not supported by Apple, such as certain background-colors or border-colors, will not take effect. Failure to comply with these guidelines could lead to your app being rejected or even a ban on your developer account by Apple.
It's the responsibility of the merchant to ensure that their use of the Apple Pay button follows Apple's guidelines, and Ottu cannot be held responsible for any issues that arise from non-compliance. If you have any questions or concerns about using the Apple Pay button, please consult the Apple Pay guidelines or contact Apple directly for assistance.
If you only want to use Apple Pay with the Ottu Checkout SDK and control the other payment methods yourself, you can customize the Apple Pay button using the Checkout SDK's formsOfPayment, applePayInit and theme properties.
Properties like buttonColor, buttonType and css properties like height, width, margin etc are can be customized using theme while buttonLocale can be customized using ApplePayInit
To display only the Apple Pay button with default css, use the following code:
Checkout.init({
    // Define the mandatory properties
    formsOfPayment: ["applePay"]
});
The formsOfPayment property tells the Checkout SDK to render only the Apple Pay button. If you don't include this property, the SDK will render all available payment options.
To customize the Apple Pay button's appearance, you can use the theme property. The example below adjusts the size of the button and centers it within the Checkout SDK container:
The Apple Pay button inside the Checkout SDK container can be customized using the theme property by defining the following:
theme.applePay: This class sets the width,height, margin, and padding of the button.theme.applePay.buttonType: This determines the type of the Apple Pay button. For example, settingbuttonType:plainwill render a plain Apple Pay button.buyordonatewill render buttons with the corresponding labels.
theme.applePay.buttonColor: This determines the color of the Apple Pay button. For example, settingbuttonColor:blackwill render a black Apple Pay button.whiteorwhite-outlinewill render buttons with the corresponding colors.
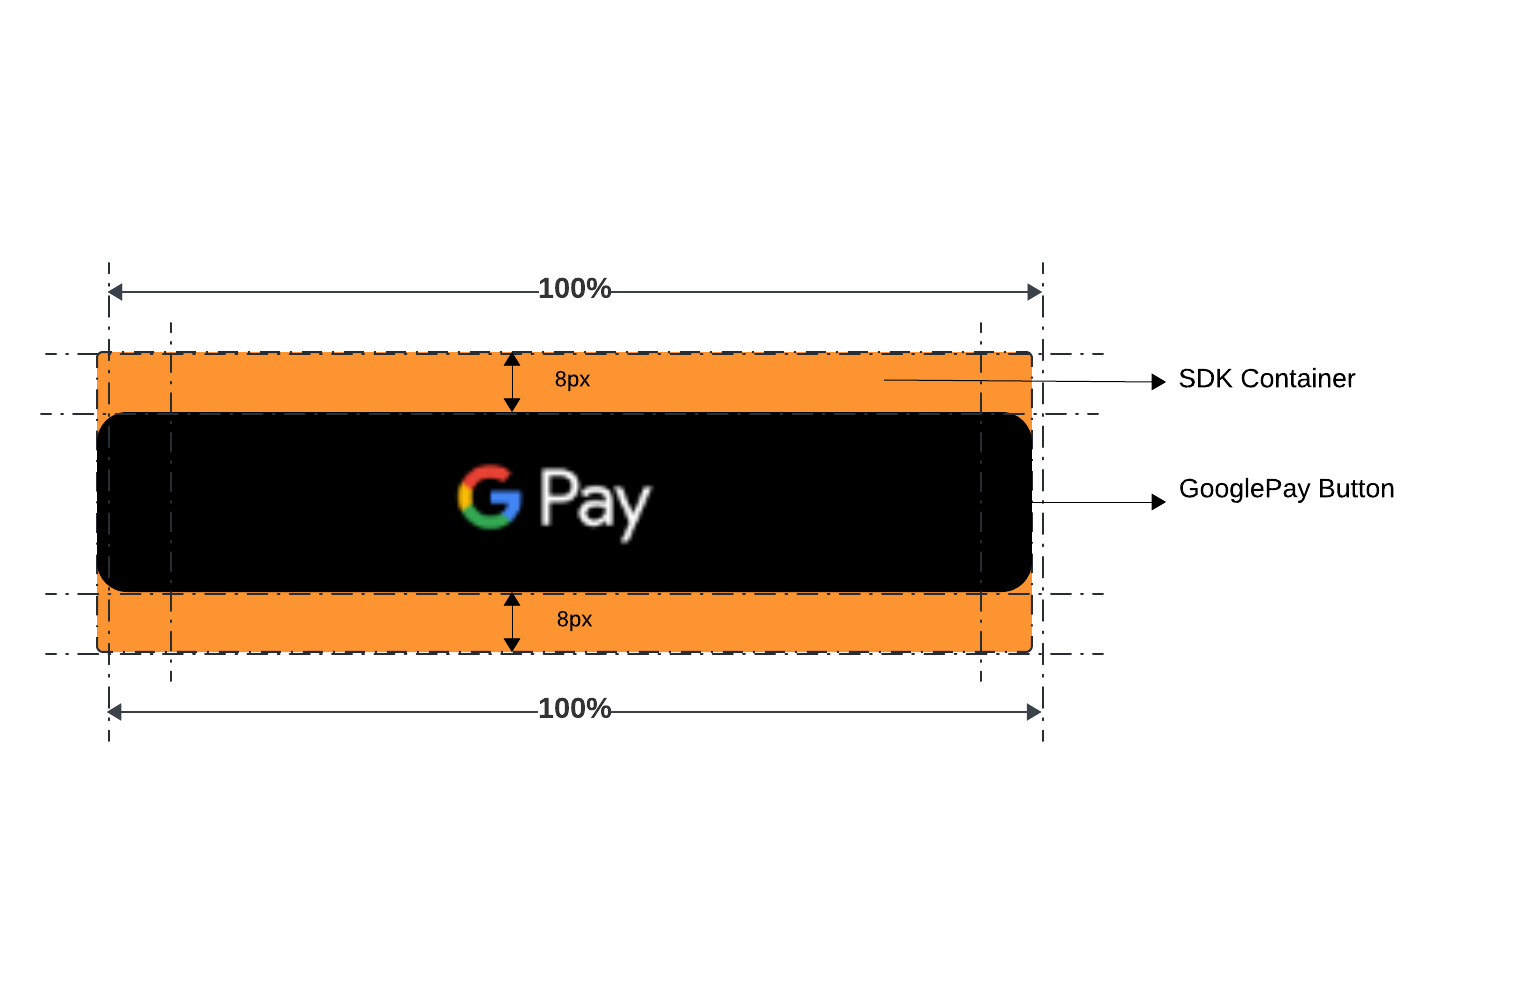
By default, the width of the Apple Pay button is 100% of the Checkout SDK container width, gap of 8px from other buttons. The Checkout SDK creates a containerized div with the css class ottu__sdk-main and places the Apple Pay button inside it. This container has no margin or padding added, as shown in below figure. To learn more about the applePay property, see the theme.

If you have completed the Google Pay integration between Ottu and Google Pay, the Checkout SDK will handle the necessary checks to display the Google Pay button seamlessly.
When you initialize the Checkout SDK with your session_id and payment gateway codes pg_codes , the SDK will automatically verify the following conditions:
The
session_idandpg_codesprovided during SDK initialization must be associated with the Google Pay Payment Service. This ensures that the Google Pay option is available for the customer to choose as a payment method.Web SDK checks if the merchant configuration for Google Pay is correct or not and then show Google Pay button based on it.
The Web SDK displays the Google Pay button irrespective of whether the customer's Google Pay wallet is configured. When the customer clicks the button, they are prompted to log in with their email and add their card if their wallet is not set up.
Google Pay configuration is controlled by using googlePayInit object.
If you're using only the Google Pay button from the Checkout SDK and wish to customize its appearance, it's vital to adhere to the Google Pay guidelines to ensure your design aligns with Google's specifications. Note that the SDK uses default styles outlined in the guidelines. Using styles not supported by Google, such as certain background-colors or border-colors, will not take effect. Failure to comply with these guidelines could lead to your app being rejected or even a ban on your developer account by Google.
It's the responsibility of the merchant to ensure that their use of the Google Pay button follows Google's guidelines, and Ottu cannot be held responsible for any issues that arise from non-compliance. If you have any questions or concerns about using the Google Pay button, please consult the Google Pay guidelines or contact Google directly for assistance.
You can customize the Google Pay button using the Checkout SDK's formsOfPayment, googlePayInit and theme . The formsOfPayment property tells the Checkout SDK to render only the Google Pay button. If you don't include this property, the SDK will render all available payment options.
Properties like buttonColor, buttonType, buttonSizeMode and css properties like height, width, margin etc can be customized using theme while buttonLocale can be customized using googlePayInit .
If you have completed the stc pay integration between Ottu and stc pay, the Checkout SDK will handle the necessary checks to display the stc pay button seamlessly. When you initialize the Checkout SDK with your session_id and payment gateway codes pg_codes, the SDK will automatically verify the following conditions:
The
session_idandpg_codesprovided during SDK initialization must be associated with the stc pay Payment Service. This ensures that the stc pay option is available for the customer to choose as a payment method.The Web SDK displays the stc pay button irrespective of whether the customer has provided a mobile number while creating the transaction or not.
You can customize the stc pay button using the Checkout SDK's formsOfPayment and theme properties. The formsOfPayment property tells the Checkout SDK to render only the stc pay button. If you don't include this property, the SDK will render all available payment options.

urpay
If you have completed the urpay integration between Ottu and urpay, the Checkout SDK will handle the necessary checks to display the urpay button seamlessly. When you initialize the Checkout SDK with your session_id and payment gateway codes pg_codes, the SDK will automatically verify the following conditions:
The
session_idandpg_codesprovided during SDK initialization must be associated with the urpay Payment Service. This ensures that the urpay option is available for the customer to choose as a payment method.The Web SDK displays the urpay button irrespective of whether the customer has provided a mobile number while creating the transaction or not.
You can customize the urpay button using the Checkout SDK's formsOfPayment and theme properties. The formsOfPayment property tells the Checkout SDK to render only the urpay button. If you don't include this property, the SDK will render all available payment options.

Due to compliance requirements, KNET requires a popup displaying the payment result after each failed payment. This is available only on the cancelCallback when there is a response from the payment gateway. As a side effect, the user can not try again the payment without clicking on Apple Pay again.
The use of the popup notification described above is specific to the KNET payment gateway. Other payment gateways might have different requirements or notification mechanisms, so be sure to follow the respective documentation for each payment gateway integration.
To properly handle the popup notification for KNET, you need to implement the provided code snippet into your payment processing flow. The code looks like this:
The above code performs the following checks and actions:
It first verifies if the
cancelobject contains information about the payment gateway (payment_gateway_info).Next, it checks if the
pg_nameproperty inpayment_gateway_infois equal tokpay, indicating that the payment gateway used is indeed KNET.If the above conditions are met, it retrieves the payment gateway's response from the
pg_responseproperty or, if not available, uses a default "Payment was cancelled." error message.Finally, it displays the error message in a popup using the
window.Checkout.showPopup()function to notify the user about the failed payment.

Last updated